It’s common for orthodontists to observe numerous patients encountering challenges with their Hawley retainers. Achieving the correct fit and proper feel of a retainer is essential for preserving a perfect smile post-braces.
Wearing a retainer may initially feel unusual; however, distinguishing between normal adjustment discomfort and an improper fit is important. A well-fitted Hawley retainer should sit snugly against the teeth and palate without causing pain or excessive pressure. Many individuals are uncertain about the correct fit of their retainer, which can lead to alignment issues over time.
Understanding Proper Hawley Retainer Fit
A correctly fitted Hawley retainer maintains tooth alignment while ensuring comfort during wear. Specific indicators, based on professional orthodontic standards, help determine if a retainer fits properly.
Signs of a Well-Fitted Retainer
- Clicks securely into place with gentle pressure
- Fits snugly against the roof of the mouth without gaps
- Creates equal pressure across all teeth
- Allows normal speech after 3-5 days of adjustment
- Stays in place during talking or swallowing
- Removes easily with intentional pressure
Common Fit Problems to Watch For
- Excessive rocking motion when seated indicates poor adaptation
- Visible gaps between the retainer wire and front teeth
- Persistent sore spots lasting more than 7 days
- Sharp edges irritating the tongue or cheeks
- Retainer feels loose within 2-3 hours of insertion
- Clicking sounds when talking or swallowing
- Metal components touching the gums
| Fit Issue | Time to Contact Orthodontist |
|---|---|
| Persistent Pain | After 7 days |
| Loose Fit | Within 24 hours |
| Wire Misalignment | Immediately |
| Crack or Break | Same day |
| Sharp Edges | Within 48 hours |
Essential Components and Their Fit
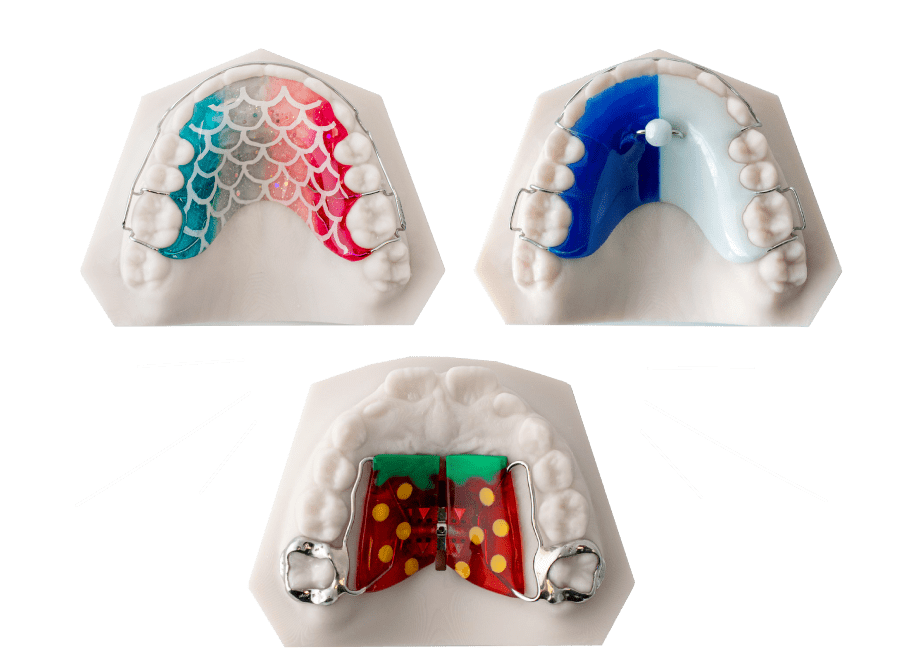
A Hawley retainer consists of three critical components that work together to maintain tooth alignment. Each component requires precise positioning for optimal effectiveness.
Wire Positioning Guide
The labial wire sits against the front teeth with 3-4 smooth contact points. The wire should not dig into the gums or float above the tooth surface. It should follow the natural curve of the teeth without creating pressure points. The vertical loops at the canines should stay centered between teeth without touching the gums.
Acrylic Base Placement
The acrylic plate molds perfectly to the roof of the mouth with complete surface contact. It extends from just behind the front teeth to the first molar region without gaps or spaces. The base should sit flush against the palate without rocking or creating air pockets. The thickness measures 2-3 millimeters throughout for consistent support.
Clasp Alignment Basics
The Adams clasps wrap around the first molars with four precise contact points per tooth. Each clasp should make firm contact with the tooth surface without pinching or leaving gaps. The wire ends should curve smoothly into the acrylic base without exposed sharp edges. The clasps should maintain equal tension on both sides for balanced retention.
| Component | Ideal Measurements | Contact Points |
|---|---|---|
| Labial Wire | 0.7mm thickness | 3-4 points |
| Acrylic Base | 2-3mm thickness | Full palatal contact |
| Adams Clasps | 0.7mm wire gauge | 4 points per molar |
What a Correct Fit Feels Like
A properly fitted Hawley retainer creates distinct sensations that indicate optimal positioning. Specific feelings experienced during wear help identify a correct fit.
First Day Wear Expectations
A new Hawley retainer creates noticeable pressure on the teeth during initial wear. The retainer feels snug against the roof of the mouth with consistent contact across all surfaces. Speech adjustments last 24-48 hours as the tongue adapts to the acrylic base. Swallowing remains normal, though extra saliva production occurs for 2-3 hours.
Normal Pressure Points
The retainer applies balanced pressure at specific contact areas:
- First molars experience firm clasping from Adams clasps
- Front teeth feel gentle pressure from the labial wire
- Palatal area senses even contact with the acrylic base
- Gum line detects light pressure without pinching
- Back teeth register slight compression from clasps
Warning Signs of Poor Fit
- Gaps between the acrylic base and palate
- Rocking motion when pressing gently on either side
- Sharp pain points lasting more than 48 hours
- Uneven pressure causing teeth to feel strained
- Persistent difficulty closing lips completely
- Clasps that feel loose on molars
- Visible space between wire and front teeth
- Clicking sounds during normal jaw movement
| Warning Sign | Action Required | Timeframe |
|---|---|---|
| Sharp Pain | Contact orthodontist | Within 24 hours |
| Loose Fit | Schedule adjustment | Within 48 hours |
| Rocking Motion | Immediate check-up | Same day |
| Visible Gaps | ||
| Adjusting to a Hawley retainer involves a predictable adaptation period. Understanding the phases of this process can help set realistic expectations for new retainer wearers. |
Initial Wearing Period
During the first 48-72 hours, noticeable pressure sensations are common. Increased saliva production typically occurs within the first 24 hours as the mouth adapts to the acrylic plate. It is recommended to wear the retainer for 20-22 hours daily during this period, removing it only for eating and oral hygiene. Mild soreness in the teeth and gums usually peaks on the second day but subsides significantly by the fourth day.
Speech Adaptation Timeline
Speech adjustments with a Hawley retainer follow a three-phase pattern:
- Days 1-3: Pronounced lisping while pronouncing “S” and “T” sounds.
- Days 4-7: Improved clarity with occasional slurring.
- Days 8-14: Return to normal speech patterns.
Practicing speaking can accelerate adaptation:
- Reading aloud for 15 minutes daily.
- Practicing problem sounds in front of a mirror.
- Recording speech to track progress.
Comfort Progression Guide
The following timeline outlines typical comfort markers:
- Days 1-3: Notable pressure sensations.
- Days 4-7: Decreased soreness.
- Days 8-14: Minimal awareness of the retainer.
- Day 15+: Complete comfort.
Physical adaptations include:
- Reduced gag reflex sensitivity by day 5.
- Normalized saliva production after the first week.
- Decreased tongue awareness by day 10.
- Natural swallowing patterns within two weeks.
Each phase brings increased comfort as the mouth adapts to the retainer’s presence. If discomfort persists beyond two weeks, it is advisable to contact an orthodontist.
Troubleshooting Fit Issues
Addressing fit problems with a Hawley retainer requires systematic evaluation to identify specific adjustment needs. Key pressure points, wire adjustments, and criteria for professional intervention are outlined below.
Common Pressure Points
Pressure points on a Hawley retainer typically occur in four specific locations:
- Mid-palatal region: A 1-inch diameter area on the roof of the mouth.
- Molar clasp zones: 2-3mm contact areas where Adams clasps grip the first molars.
- Anterior labial wire: 3-4 contact points along the front teeth.
- Palatal border: A 2mm wide band where the acrylic meets the gum tissue.
The following table summarizes normal sensations and warning signs for each pressure point:
| Pressure Point | Normal Sensation | Warning Sign |
|---|---|---|
| Mid-palatal | Gentle contact | Sharp pain |
| Molar clasps | Firm grip | Pinching |
| Labial wire | Light pressure | Digging |
| Palatal border | Slight pressure | Raw feeling |
Wire Adjustment Needs
The labial wire may require specific adjustments in the following situations:
- Excessive pressure: Wire sits more than 0.5mm into the gum tissue.
- Insufficient contact: Gaps exceed 0.3mm between wire and teeth.
- Uneven pressure: Wire touches some teeth but leaves gaps over 0.2mm on others.
- Vertical misalignment: Wire sits above or below the tooth midline by more than 1mm.
When to Seek Professional Help
It is important to consult an orthodontist if any of the following issues arise:
- Persistent pain lasting beyond 72 hours of wear.
- Visible cracks longer than 2mm in the acrylic base.
- Clasps that move more than 0.5mm when touched.
- Speech impediments continuing past 14 days.
- Gaps between retainer and teeth exceeding 1mm.
- Wire breaks or sharp edges causing tissue irritation.
Maintaining Proper Fit
Proper maintenance ensures a Hawley retainer maintains its precise fit during daily wear. These practices protect the retainer’s shape, extend its lifespan, and prevent unwanted teeth movement.
Daily Care Impact on Fit
Daily cleaning habits directly affect a Hawley retainer’s fit. It is recommended to brush the retainer with a soft-bristled toothbrush after each meal using lukewarm water to remove debris. Deep cleaning requires soaking in a retainer cleaning solution for 15 minutes to eliminate bacteria buildup that can alter the acrylic base shape. Avoid hot water, harsh chemicals, or abrasive cleaners that can deform the acrylic or bend the wire components.
Storage Best Practices
Proper storage preserves the retainer’s custom fit specifications. Store the retainer in its ventilated case when not in use, keeping it away from heat sources that exceed 120°F. Place the case in a cool, dry location to prevent warping of the acrylic base. Never wrap the retainer in napkins or loose materials – 80% of retainer replacements result from improper storage leading to loss or damage.
Preventing Fit Issues
- Check wire alignment daily using a mirror
- Examine clasp tightness on molars every morning
- Monitor acrylic base for cracks or chips weekly
- Clean retainer thoroughly after eating sticky foods
- Handle the retainer by the acrylic portion, not the wires
- Remove retainer using both hands to prevent warping
- Keep pets away from the retainer case
- Replace the storage case every 6 months
| Maintenance Task | Frequency | Impact on Fit |
|---|---|---|
| Cleaning | After meals | Prevents debris buildup |
| Deep cleaning | Weekly | Maintains acrylic shape |
| Wire check | Daily | Ensures proper alignment |
| Case cleaning | Weekly | Prevents bacterial growth |
| Professional check | Every 6 months | Validates fit accuracy |
Professional Fitting Process
A professional Hawley retainer fitting involves precise measurements and multiple adjustments to ensure optimal dental alignment. The process requires specialized orthodontic expertise to achieve the perfect fit for each patient’s unique dental structure.
Initial Fitting Steps
- Take digital scans or physical impressions of the teeth for accurate measurements
- Create detailed molds capturing palatal contours with 0.5mm precision
- Measure inter-molar width using calibrated calipers (32-42mm range)
- Mark key anchor points for clasp placement on first molars
- Test initial wire placement against facial contours
- Document baseline tooth positions with intraoral photographs
Adjustment Procedures
- Bend labial wire to achieve 3-4 contact points with front teeth
- Shape Adams clasps to create 4 precise contact points per molar
- Heat-adjust acrylic base for optimal palatal contact (2-3mm thickness)
- Verify vertical height clearance of 1-2mm when biting
- Test retainer stability through bite pressure variations
- Smooth any rough edges with specialized polishing tools
Follow-up Appointments
- Schedule first check-up 48 hours after initial fitting
- Conduct pressure point assessment at 1-week mark
- Perform wire tension verification at 2-week appointment
- Complete fit evaluation at 1-month milestone
- Document tooth position stability with progress photos
- Schedule maintenance checks every 3-4 months
| Appointment Type | Timing | Key Assessments |
|---|---|---|
| Initial Check | 48 hours | Pressure points, speech adaptation |
| First Follow-up | 1 week | Comfort level, clasp fit |
| Second Follow-up | 2 weeks | Wire alignment, bite check |
| Monthly Review | 4 weeks | Overall stability, wear patterns |
When to Replace Your Retainer
Orthodontic professionals should advise patients to monitor their retainers for signs indicating the need for replacement. Key indicators include visible wear such as cracks or chips, a compromised fit—either too tight or too loose—and persistent discomfort during use. Prompt replacement upon identifying these signs is crucial to prevent potential tooth misalignment and to ensure the continued effectiveness of the orthodontic treatment.
At ODL Orthodontic Lab, we are dedicated to supporting orthodontic professionals in delivering exceptional patient care. If you have any questions or require assistance with our products, please reach out.


